In our first deep-dive we are leveraging (local) Vector Stores and LangChain for Cost-Efficient, Context-Aware Conversations with GPT-4 in Node.js.
Introduction
In our previous post, we discussed the importance of providing context when using large language models like ChatGPT to generate content. We explored the “garbage in, garbage out” concept and emphasized the need for precise, clear, and adequate context to receive accurate, relevant, and coherent information. We also shared two practical strategies for providing context: including context directly in the prompt and using embeddings.
In that post, I promised to provide a step-by-step guide on creating a script for generating and using embeddings and provide an example repository for reference. In this follow-up post, we will dive into the process of building a powerful, context-aware chatbot using Node.js, which supports not only unlimited context but also unlimited chat history in under 100 lines of code.
Building Our Chatbot
In this section, I will walk you through the step-by-step process of building a GPT-4 powered chatbot using Node.js. The chatbot leverages the HNSWLib vector store for unlimited context and chat history, allowing for more cost-efficient, context-aware conversations. By following along with this guide, you will gain a deeper understanding of the chatbot’s inner workings and be able to customize it to suit your needs.
Prerequisites
Before we dive into building the chatbot, there are a few prerequisites you need to have in place. Ensuring these are set up correctly will make the process smoother and more efficient.
- I tested this on Linux, Mac and Windows Subsystem for Linux (WSL). The commands I provide assume one of these environments.
- OpenAI Account and API key: You will need an OpenAI account to access the OpenAI API. If you don’t already have one, sign up for an account on the OpenAI signup page. After registering and logging in, create an API key on the API keys page. Don’t forget to make a note of the key as they are not displayed again after creation.
- Node.js: Ensure that you have Node.js installed on your system. If you don’t have it installed, visit the Node.js website to download and install the appropriate version for your operating system.
- Git (optional): While not strictly necessary, having Git installed will make it easier to clone the repository and keep track of any changes you make to the code. If you don’t have Git installed, visit the Git website to download and install it.
With these prerequisites in place, we are ready to start building our chatbot.
Basic Setup
We are building a command-line application using Node.js and TypeScript so lets setup the project and the basic readline interface for interacting with the bot.
In a new directory of your choosing, create a package.json by running:
npm init
(The default values are fine)
We want to use TypeScript for this project so we’re going to install packages and configure it.
Install dependencies
npm add --save-dev typescript tsx @types/node @tsconfig/recommended npm add dotenv npm install
create a src directory
mkdir src
To configure TypeScript for our project download the following tsconfig.json and put in the root of the project with the name tsconfig.json.
As the final step in our basic setup, we will change the main entry point in the project’s package.json and add some scripts to build and start the bot. We will also be using ES modules, so we will add the module type to the file.
{
  ...
  "main": "./dist/index.js",
  "type": "module",
  "scripts": {
    "build": "tsc --declaration --outDir dist/",
    "dev": "tsx -r dotenv/config src/index.ts --inspect",
    "start": "npm run build && node -r dotenv/config dist/index.js"
   }
  ...
}
The main loop
Create the main file src/index.ts in your favourite IDE and add the following to it:
// src/index.ts

import * as readline from 'node:readline/promises';
import { stdin as input, stdout as output } from 'node:process';

const rl = readline.createInterface({ input, output });

while (true) {
  const userInput = await rl.question('How can I help? ');
Because we are building a chatbot, we want a simple method to converse with the bot using stdin and stdout, this loop works perfectly for our purposes and as a bonus it can also output streams so we can enable OpenAI’s streaming mode later.
Run the bot using npm run dev or npm start, and you will see that the program currently does nothing more than parrot what you input. In the following sections, we will build upon this foundation to create a fully functional chatbot.
Adding OpenAI
In this step, we will integrate the powerful OpenAI API into our chatbot using LangChain. LangChain is a convenient library that simplifies interactions with the API, streamlines the construction of prompts, and efficiently manages Vector Stores. By leveraging LangChain, we can focus on building a robust chatbot without getting bogged down in the complexities of creating embeddings and performing similarity searches.
It is perfectly possible to implement this bot without using LangChain, however the title of this post would probably be in Under 100 Lines of Code and would be less catchy!
To start, add LangChain to our dependencies:
npm add --save langchain
And make sure to add your OpenAI API key you created earlier to an .env file.
# .env
OPENAI_API_KEY=sk-***
Lets update our bot to use the OpenAI API for the first time!
// src/index.ts

import * as readline from 'node:readline/promises';
import { stdin as input, stdout as output } from 'node:process';
import { OpenAIChat } from 'langchain/llms/openai';

const rl = readline.createInterface({ input, output });

const chat = new OpenAIChat({
  streaming
Note that I’ve set the modelName to
_gpt-3.5-turbo_for testing. We can set this to_gpt-4_later on to make use of OpenAI’s most powerful model but for now I would recommend using gpt-3.5-turbo as it is more than 10x cheaper.
Run the bot again and ask it a question and you will get an answer from OpenAI.
While the communication with the API is working, we can recognize that the API is stateless and has no recollection of our previous messages. Unlike when using the ChatGPT UI, it is the responsibility of the developer to implement any form of conversation history.
Bonus: Output as a stream
The OpenAI API supports sending a stream response, which enables us to start outputting its response immediately instead of waiting for the entire response. This feature allows for a more interactive and responsive chatbot experience, as the user receives feedback faster, creating a more engaging conversation.
To add streaming to our bot we can make use of LangChain’s callback system. Adapt index.ts as follows:
// src/index.ts

import { CallbackManager } from 'langchain/callbacks';
...

const callbackManager = CallbackManager.fromHandlers({
  async handleLLMNewToken(token: string) {
    output.write(token);
  },
});

...

const chat = new OpenAIChat({
  ...
  callbackManager
Adding Context and Memory
If we were building a clone of ChatGPT, the next step would be to add transient chat history and send the entire conversation history to the API with each new request. While this approach works, as discussed in the previous post, it is limited by the maximum number of tokens allowed in a conversation and can be potentially expensive. If you are interested in learning how to implement such a memory using LangChain, you can read more about some options here.
We are not going down that route. Instead, we will add Vector Stores for both our context and conversation history, allowing them to grow infinitely. This approach enables us to send only the relevant context to the OpenAI API, thus saving money and ensuring more efficient context-aware conversations.
For those unfamiliar with Vector Databases/Stores, you can learn more about them here.
Improving our Prompt
First, let’s create a more intelligent prompt for our purposes, informing the model about how it should act and that we will be providing context and chat history.
We will use a LangChain chain (ConversationChain) and prompt templates to help us deal with the boilerplate of assembling our prompt and sending it to the API.
The LangChain documentation states:
Chains is an incredibly generic concept which returns to a sequence of modular components (or other chains) combined in a particular way to accomplish a common use case.
The most commonly used type of chain is an LLMChain, which combines a PromptTemplate, a Model, and Guardrails to take user input, format it accordingly, pass it to the model and get a response, and then validate and fix (if necessary) the model output.
Adapt the index.ts to make use of the ConversationChain:
First add a helper utility to help with prompt formatting
npm add --save common-tags npm add --save-dev @types/common-tags
// src/index.ts

...
import {
  ChatPromptTemplate,
  HumanMessagePromptTemplate,
  MessagesPlaceholder,
  SystemMessagePromptTemplate,
} from 'langchain/prompts';
import { ConversationChain } from 'langchain/chains';
import { oneLine } from 'common-tags';

...

const chatPrompt = ChatPromptTemplate.fromPromptMessages([
  SystemMessagePromptTemplate.fromTemplate(`You are an AI assistant called DocuBot, a world class copywriter and marketing professional, you will craft high-quality, professional, relevant and engaging marketing materials and copy, such as website copy, slogans, keywords, newsletters and social media posts tailored to the user's target audience. You have access to the chat history with the user and to context provided by the user. Some of the chat history is provided as JSON, don't output this JSON.

Adding Context
As mentioned, we will be using HNSWLib as our Vector Store. HNSWLib has the advantage of being an in-memory Vector Store that can be saved to a local file, so we don’t need to spin up any other services or use a cloud provider. There are many other alternatives if you are building an production-ready application. At DocIQ, we use a mixture of pgvector and redis.
Lets get started by installing hnswlib-node:
npm add --save hnswlib-node
Now we are going to add a directory for the content we want to index and for saving the Vector Store index to disk.
in your project directory
mkdir docs db
Create a file called example.md in the newly created docs folder and fill it with some content that you want our bot to know about. Alternatively can download and use my example file.
It’s time to finally add context to our bot:
// src/index.ts

...
import path from 'path';
import { HNSWLib } from 'langchain/vectorstores/hnswlib';
import { OpenAIEmbeddings } from 'langchain/embeddings/openai';
import { RecursiveCharacterTextSplitter } from 'langchain/text_splitter';
import { DirectoryLoader } from 'langchain/document_loaders/fs/directory';
import { JSONLoader } from 'langchain/document_loaders/fs/json';
import { TextLoader } from
Whew! That was a lot, but it was the largest step, so bear with me and we will go through it step-by-step:
We import HNSWLib and some helper classes from LangChain to help us create Embeddings, but the main chunk of code is the new loadOrCreateVectorStore and getRelevantContext methods. Let’s take a closer look at them in particular:
loadOrCreateVectorStore
- This method either loads an existing or creates a new HNSWLib Vector Store.
- If we are creating a new Store, we execute the following steps:
- Use a DirectoryLoader, which can recursively load multiple files at once and assign a document loader to them based on their file type
- Assign the correct Document Loader to use per file type
- Load and split the documents into chunks using the RecursiveCharacterTextSplitter
- Create a new Store, which consists of the chunked documents and their embeddings
- Save the new Store to a file in the db directory.
This is where LangChain shines. This relatively simple method is reading files, splitting them into pieces, sending the pieces to the OpenAI Embedding endpoint, and creating a new Vector Store index for us.
getRelevantContext
Given a Vector Store and a question (prompt), this method will return the specified number of documents that best match the question semantically. To achieve this, LangChain automatically creates an Embedding of the question to perform an approximate nearest neighbor search against the records in our Vector Store.
The parameter numDocuments lets us tweak our context-aware bot by seeing the effect of returning more or fewer relevant pieces of context. Of course, the more we return, the larger the prompt that will be sent to the API.

Go ahead and run our bot again and see if it can already answer questions specific to the content you provided!
Adding the Chat History
Incorporating an “unlimited size chat history” into our bot works similarly to adding context. We will use another HNSWLib Vector Store to keep track of our conversation and inject relevant parts of it into the prompt as needed. This approach allows our chatbot to maintain a comprehensive conversation history while efficiently managing its size and relevance.
Add a directory for storing our chat history vector store in the root of our project
mkdir memory// src/index.ts
...
import { Document } from 'langchain/document';
...
const memoryDirectory = path.join(__dirname, 'memory');
const memoryVectorStore = await loadOrCreateMemoryVectorStore(memoryDirectory);
...
while (true) {
const userInput = await rl.question('\x1b[92mHow can I help?\x1b
...
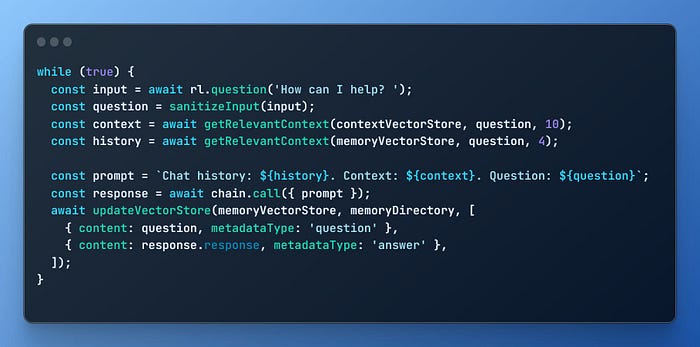
I won’t go through these methods step-by-step, as they are very similar to the ones we have already implemented. The only differences are that we return fewer results from the chat history compared to our context documents, and we need to manually save the chat history Vector Store after a question/response. We are also adding metadata to the store while saving, in case we want to implement a hybrid search at a later date.

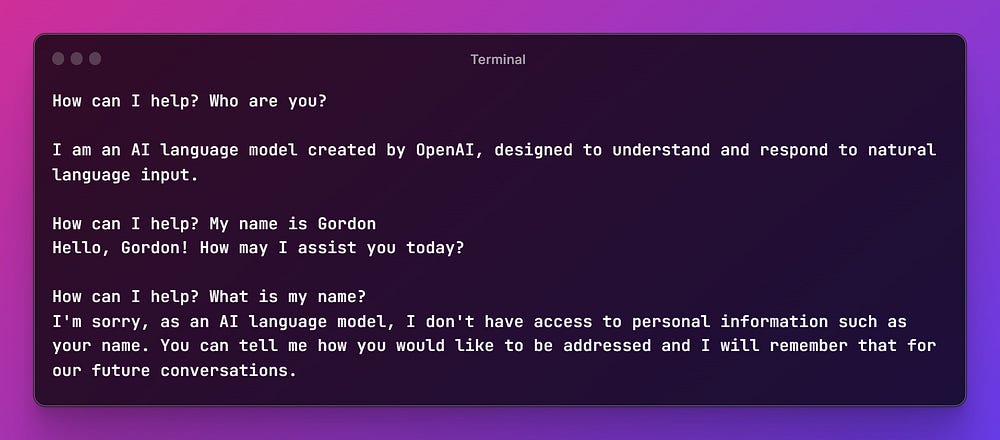
The bot is now complete and can remember our prior conversations, as well as utilize any context we provide for content generation. This powerful combination of unlimited chat history and context allows our GPT-4 powered chatbot to deliver more accurate, relevant, and engaging responses at a fraction of the cost, providing a better user experience.
Repository and improving the Bot further
You can find the complete repository for our GPT-4 powered chatbot at https://github.com/gmickel/memorybot. The repository version includes some additional features that enhance the chatbot’s functionality:
- A transient rolling memory window for the last 2 pieces of conversation history, which improves accuracy when refining the bot’s last response
- A log that records all prior conversations with the bot
- Improved structure for easier customization and maintenance
I encourage you to explore the repository, experiment with the chatbot, and try out the additional features. By doing so, you’ll gain a better understanding of the chatbot’s capabilities and see how it can be customized to meet your specific needs. Don’t hesitate to share your feedback and suggestions, as they can help improve the chatbot even further.
Some ideas for further exploration
- Accept additional file and content types for the context, such as videos, PDFs, websites.
- Allow the user to initiate new conversations or switch between different contexts using hybrid search or multiple Vector Stores
Update 11.05.23
The repository version now supports:
- .pdf, .epub, .csv, .docx files for Context
- Automated website scraping for Context
- Automated YouTube video transcript fetching for Context
- Commands
- Adding Context at runtime
- Configurable Context Retrieval (how many relevant documents to retrieve)
- Configurable Memory Retrieval (how many relevant chat messages from the conversation history to retrieve)
Conclusion
I hope you find this guide and the accompanying repository useful in building your own context-aware, GPT-4 powered chatbot. As always, and as mentioned in the previous post, consider the implications of sharing sensitive content. While providing context is crucial for generating accurate and relevant content, it’s important to be mindful of the information you share with AI systems (or any system for that matter). If you’re working with proprietary code, sensitive data, or confidential information, be cautious about including such details in your prompts or embeddings. Always ensure that you’re adhering to your organization’s security policies and best practices to protect your valuable assets.
If you enjoyed this post and found it valuable, please share it with others who might be interested in AI and chatbot development. Don’t forget to subscribe to my blog to stay updated on the latest trends, technologies, and best practices in the AI and software development industry. Your support and feedback are much appreciated, and they help me continue to create informative and insightful content for you. Happy coding!
Please support my work on Medium and get unlimited access by becoming a member using my referral link here. Have a nice day!
Further reading
💡 Want to Read More?
Subscribe to my weekly newsletter.
Connect on Twitter here.